

HDR-Jack 2 - The improved HDR and interval trigger
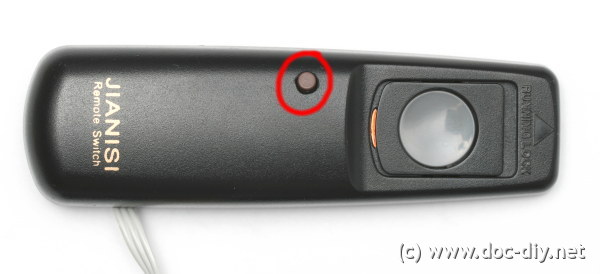
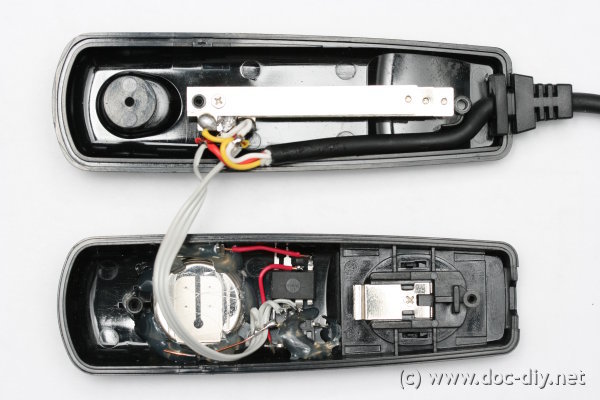
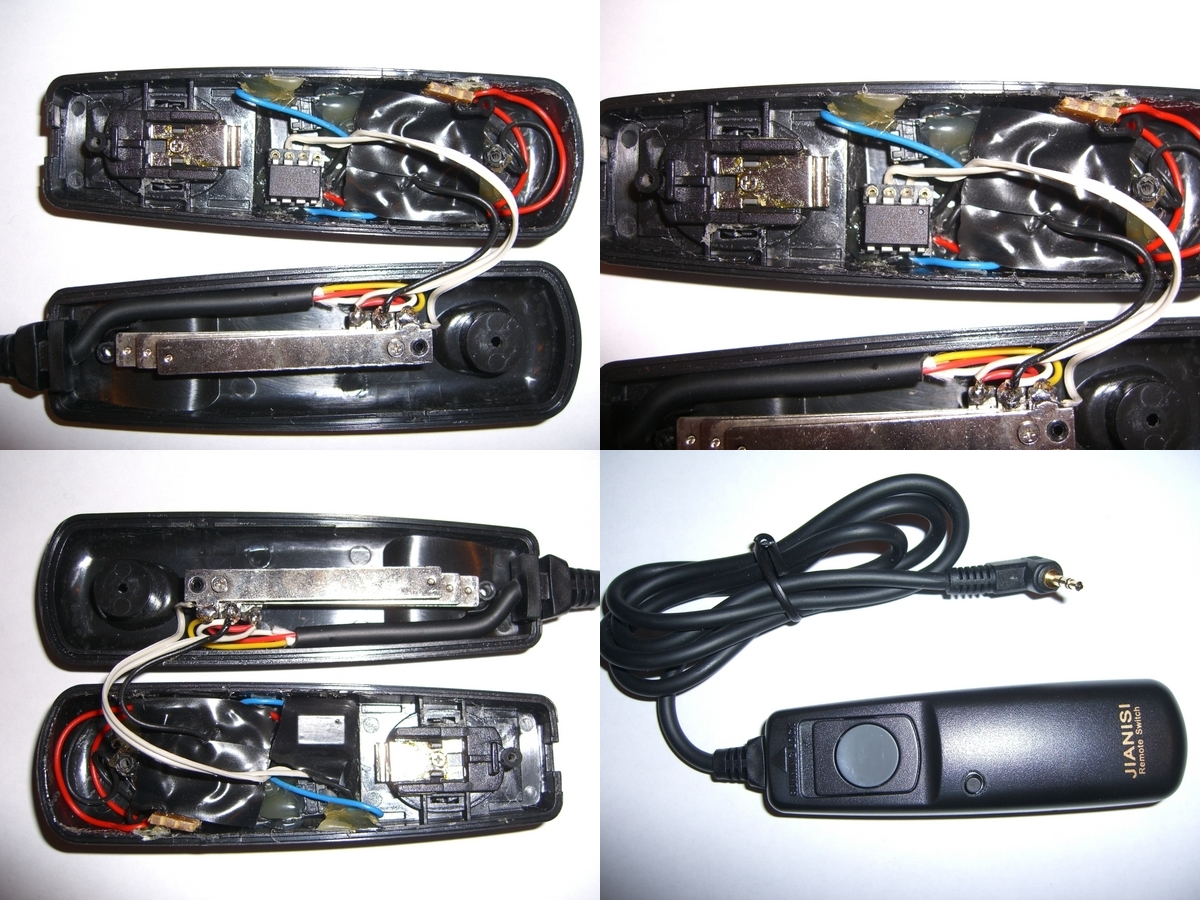
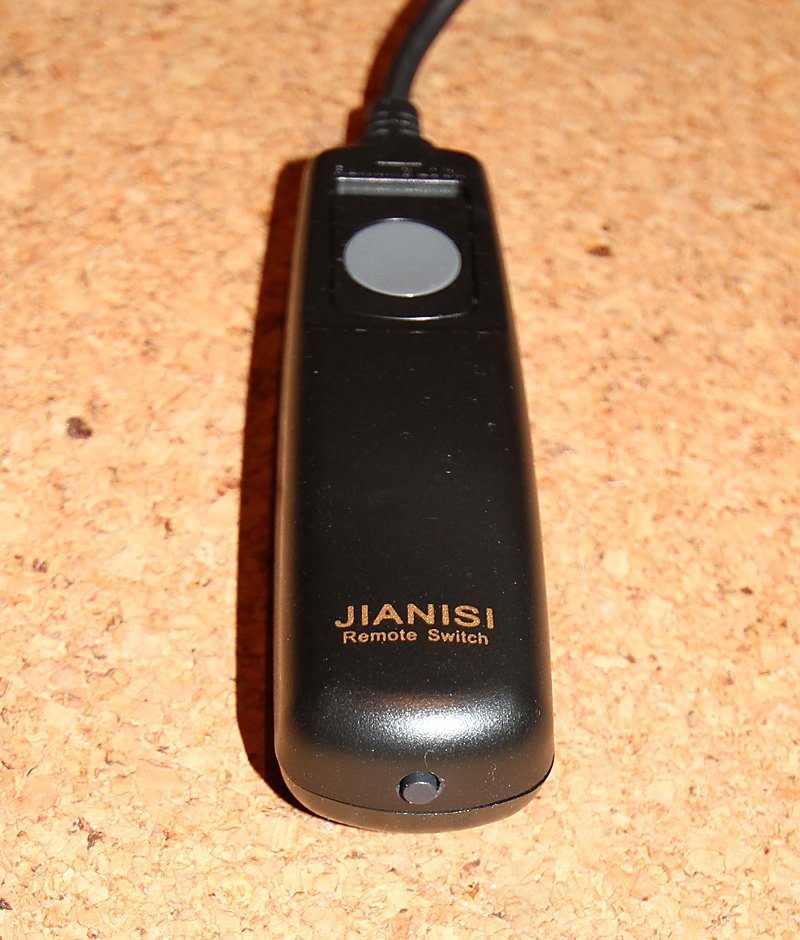
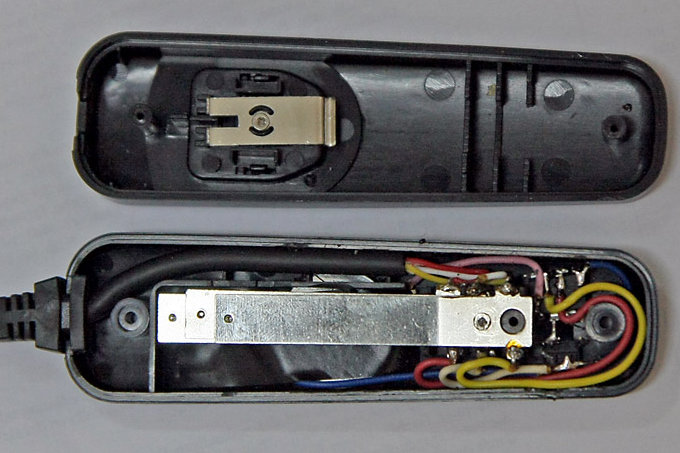
This article explains how to build the second improved version of the HDR-Jack. In contrast to the original circuit this version is powered from a lithium coin battery. This results in compatibility with cameras not supported by the first version, because of the focus wire issue. The circuit can be easily embedded in the enclosure of a cable remote controller as shown in the pictures below. The original function of the cable release is preserved.
Modes of operation
The following table lists all functions of the HDR-Jack 2. They are activated by pushing the small "extra" button. Modes 1 to 5 provide different bracketing series and an interval function. Modes 6 to 17 allow the configuration of the trigger.
| # | Function | Activation | |
|---|---|---|---|
| Presses | Long last press | ||
| 1a | HDR uni 2 EV | 1 | - |
| 1b | Interval | 1 | yes |
| 2a | HDR day 2 EV | 2 | - |
| 2b | HDR day 1 EV | 2 | yes |
| 3a | HDR night 2 EV | 3 | - |
| 3b | HDR night 1 EV | 3 | yes |
| 4a | HDR ML uni 2 EV | 4 | - |
| 4b | HDR ML uni 1 EV | 4 | yes |
| 6 | set exp. gap to 0.25 s | 6 | - |
| 7 | set exp. gap to 0.5 s | 7 | - |
| 8 | set exp. gap to 0.75 s | 8 | - |
| 9 | set exp. gap to 1.25 s | 9 | - |
| 10 | set exp. gap to 2 s | 10 | - |
| 11 | set exp. gap to 3 s | 11 | - |
| 12 | no skip | 12 | - |
| 13 | skip < 1/60 | 13 | - |
| 14 | skip < 1/8 | 14 | - |
| 15 | shutter only | 15 | - |
| 16 | focus + shutter | 16 | - |
| 17 | focus then shutter | 17 | - |
Functions 1a) to 4b) can be interrupted by pushing the button once. "Long last press" means that the button is pressed for more than 0.5 second during the last press. Examples:
Mode 1b: _______-----------____
Mode 2a: _______-__-___________
Mode 2b: _______-__--------____
and so on...
Detailed description of functions
1a) HDR uni 2 EV
This is the all-purpose bracketing series with an EV step of 2. The nominal exposure
times are 1/125, 1/30, 1/8, 1/2, 2, 8 and 30 seconds. The shortest time might
vary strongly depending on the camera.
1b) Interval mode
The hold time of the button is used as the interval period. The duty
cycle is approx. one. Example: Holding the button down for 4 s results in a
trigger sequence with 2 s on and 2 s off.
2a) HDR day 2 EV
This is a short bracketing series for daylight conditions with an EV step of 2.
The nominal times are 1/200, 1/60, 1/15, 1/4 and 1 second. The shortest time might
vary strongly depending on the camera.
2b) HDR day 1 EV
This is a short bracketing series for daylight conditions with an EV step of 1.
The nominal times are 1/200, 1/125, 1/60, 1/30, 1/15, 1/8, 1/4, 1/2 and 1 second.
The shortest time might vary strongly depending on the camera.
3a) HDR night 2 EV
This is a short bracketing series for low light conditions with an EV step of 2.
The nominal times are 1, 4, 15, 60 and 240 seconds.
3b) HDR night 1 EV
This is a short bracketing series for low light conditions with an EV step of 1.
The nominal times are 1, 2, 4, 8, 15, 30, 60, 120 and 240 seconds.
4a) HDR ML uni 2 EV
This is the all-purpose bracketing series with an EV step of 2 and mirror
lock-up support. The nominal exposure times are 1/15, 1/4, 1, 4, 15 and 60 seconds.
4b) HDR ML uni 1 EV
This is the all-purpose bracketing series with an EV step of 1 and mirror
lock-up support. The nominal exposure times are 1/15, 1/8, 1/4, 1/2, 1, 2, 4, 8, 15, 30 and 60 seconds.
5)
This function has been left blank intentionally to avoid unintended
change of settings.
6) to 11) Exposure gap settings
Using these functions the time gap between the exposures in the
bracketing sequences can be changed. The value is saved permanently in
the EEPROM of the microcontroller. This feature has been implemented
to optimally exploit the possibilities of the camera in use and keep step
with the development. Setting a larger gap gives you possibility to
check the histogram in the preview after each exposure so you can abort
the bracketing and save time.
12) to 14) Short exposure skip
The minimum bulb exposure time of some camera modells might be longer
than the times provided by the HDR-Jack 2. The effects are skipped shots or
jumping exposure times. To avoid unnecessary waiting or unusable shots, you can skip the shortest
times according to the description in the table. The limiter is also
practical if the first shots result in the same exposure level.
15) to 17) Trigger pulse settings
These functions allow to change the way the trigger pulse is generated.
Different camera modells behave differently depending on how the trigger signal
is applied. DSLRs of the EOS xxxD series and the 1000D show best reproduction of the
nominal exposure times when triggered using the shutter wire only. In contrast, the
EOS 40D needs always both wires for bulb exposure.
Usage of HDR modes
- Plug in trigger
- Set the camera to the manual mode M
- Set shutter speed to BULB
- Set aperture
- Focus on scenery
- Set camera to manual focus
- (Enable mirror lock-up if desired)
- Trigger by pushing the small "extra" button
The interval mode requires no special settings on the camera. It is recommended to use manual focusing especially for dark scenes to avoid missed triggers caused by focus hunting.
Limitations
The HDR-Jack 2 uses the bulb mode to control the exposure time. This very simple
principle avoids complicated protocols and is compatible with many camera types, but
also has its limitations. The biggest one concerns the minimum exposure time.
To my knowledge, the shortest exposure time observed with a Canon
DSLR in bulb mode is about 1/200 s. With other brands this time becomes even longer
(measured 1/10 with Nikon D80, 1/8 wit Sony a350, heard of 1/60 with Pentax).
Unfortunately it is not possible to control the camera properly at very short times.
Older Canon cameras without live-view seem to perform better than newer ones.
For live-view types from Canon exposure times shorter than approx. 1/4 s
become increasingly instable and might be missed by the camera.
Another limitation concerns the EXIF data generated by DSLRs in bulb mode.
Canon limits the precision to seconds, so every exposure under 1 s will result
in an EXIF exposure time of 1 s.
Sony cameras write 1/10 s for every bulb exposure under 1 s.
Compatibility
Basically all cameras with a cable remote control connector and the bulb
exposure option are compatible with the HDR-Jack 2 if the aforementioned
limitations are taken into account.
The following table lists optimal settings for different camera types. The data is
obtained from own tests or is reported by users. You are welcome to contribute!
The exposure gap can be set depending on your preferences. Longer times let
you check the exposure.
| Camera | Ex. gap [s] | Exp. Skip | Pulse | Comment |
|---|---|---|---|---|
| EOS 350D (XT) | 1.25 | none | S | Shortest exp. approx. 1/180 s |
| EOS 400D (XTi) | 1.25 | none | S | Shortest exp. approx. 1/180 s |
| EOS 450D (XSi) | 1.25 | < 1/60 | S | Shortest exp. approx. 1/60 s |
| EOS 500D (T1i) | 1.25 | < 1/8 | S | Shortest exp. approx. 1/2 s |
| EOS 550D (T2i) | 1.25 | < 1/8 | S | Shortest exp. approx. 1/4 s |
| EOS 1000D | 1.25 | < 1/60 | ? | Shortest exp. approx. 1/60 s |
| EOS 20D | 1.25 | < 1/60 | S | Shortest exp. approx. 1/60 s |
| EOS 30D | 1.25 | ? | ? | |
| EOS 40D | 1.25 | none | F+S | Short exp. brighter than nominal value |
| EOS 50D | 0.75 | ? | ? | Shortest exp. approx. 1/4 s |
| EOS 60D | 0.75 | none | ? | Shortest exp. approx. 1/100 s |
| EOS 5D | ? | ? | ? | Compatible, no info on short times until now |
| EOS 5Dmk2 | ? | < 1/8 | x | Shortest exp. at approx. 1/4-1/8 s, one user reported 1/100 s |
| EOS 7D | ? | < 1/60 | F+S | Shortest exp. approx. 1/60 s |
| Pentax K100D Super | Compatible | |||
| Nikon D300 | < 1/8 | F+S | Shortest exp. approx. 1/8 s | |
| Nikon D700 | < 1/8 | F+S | Shortest exp. approx. 1/8 s | |
| Nikon D5000 | < 1/8 | F+S | Shortest exp. approx. 1/8 s | |
| Nikon D90 | < 1/8 | F then S | 1/4 s shortest exp. time | |
| Fuji S3 Pro | F+S | 1/4 s shortest exp. time | ||
| Sony a350 | 1.25 | < 1/60 | F+S | 1/8 s shortest exp. time |
| Sony a100 | 0.75 | < 1/60 | F+S | |
| Lumix GF1 | ? | < 1/60 | F+S | Shortest exp. approx. 1/30 s, needs adapter circuit |
| Olympus E-510 | 1.25 | < 1/60 | F+S | Shortest exp. approx. 1/30 s |
Gallery
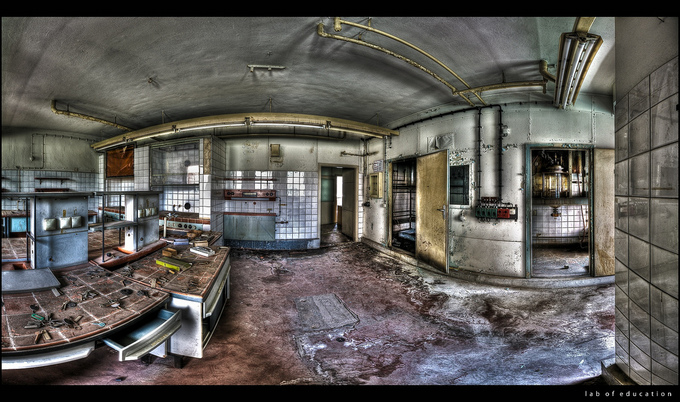
Taken by Feldman, a true HDR enthusiast
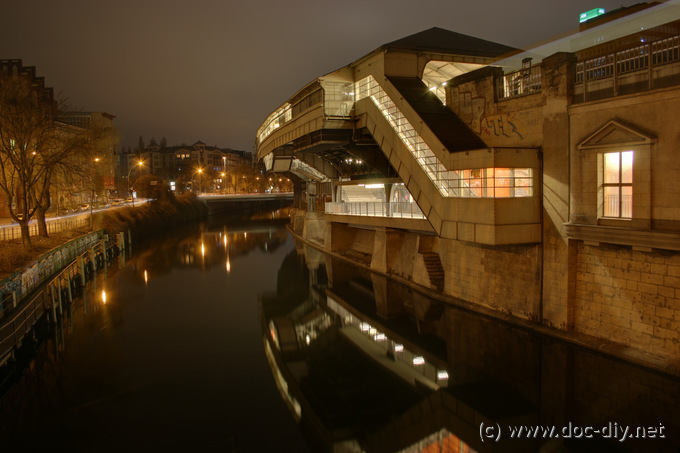

Metro station "Hallesches Tor" in Berlin. The bracketed images were merged using enfuse, own work.

Old town in Krakow. Merged using enfuse and stitched with Autopano, own work.
HDR-Jack 2 built by Björn Hövelmann. A socket was used to allow reprogramming of the AVR.
HDR-Jack 2 built by Sönke Martens. The button is positioned in the lower end of the cable release body.
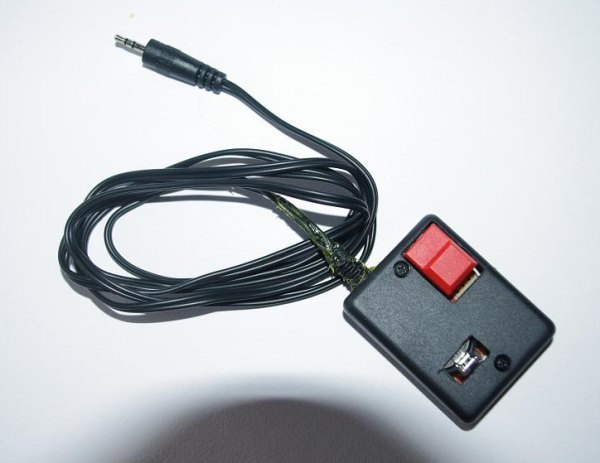
HDR-Jack 2 built by Felix Kramer.
HDR-Jack 2 built by Kerstin.
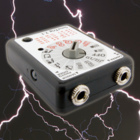
The Circuit
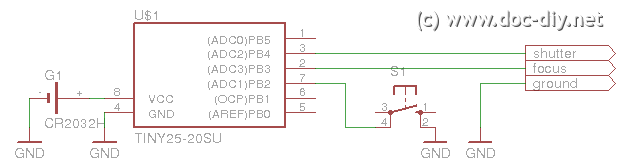
The circuit consists of just three parts. The ATtiny25 AVR microcontroller, a push-button and a battery. The whole circuit has a current consumption of just 5 uA in active mode and <0.5 uA in stand-by. Assuming an average supply current of 1 uA and a battery capacity of 200 mAh a theoretical life time of 200000 hours can be expected. This is more than 20 years.
Parts and Assembly
The ATtiny25 can be replaced by the ATtiny45 or ATtiny85. The only difference is the flash memory size (and the price). There is also a low voltage version of the controller with a V appended to the name (ATtinyXXV). It is also a very good (or even preferred) choice. The battery should be a 3 volt lithium type or a stack of standard batteries. The 2032 is a good choice because of the large capacity and good availability/price. For the push-button a standard tactile switch can be used. A plunger length of ~3.5 mm is recommended if the switch is mounted as shown in the title picture above.
Software and programming
The code is written in C. Because the controller is permanently
connected to the battery, it is essential to keep
it in power-down mode most of the time to save battery life.
All timing functions are implemented using the watchdog timer running at 128
kHz. The watchdog timer is strongly voltage dependent, but does a good job
in the application described here.
After initialisation the uC is put into sleep until the button is pressed.
Depending on the number of presses and the duration of the last press, one of
the functions described above is executed.
Each function ends with a hardware reset carried out by the watchdog.
The configuration functions make use of the EEPROM of the AVR to store the
values permanently.
You will need a programmer to transfer the hex and eep file to the microcontroller.
There is a big variety of programmers on the market and on DIY web sites.
Depending on the features (USB, parallel port, JTAG, debugging functions)
the cost ranges between 1 and 100 Euros. I use a home-brew
STK200 clone
for the parallel port. I you want to buy a programmer, go for a simple and popular
(forum support) USB version. The good thing about programmers is that any programmer
will program any AVR microcontroller.
If you are not familiar with microcontrollers I strongly recommend to go through
one of the beginner tutorials at avrfreaks.
German-speaking readers should have a look at www.mikrocontroller.net
If you have your programmer working, the programming is rather straightforward.
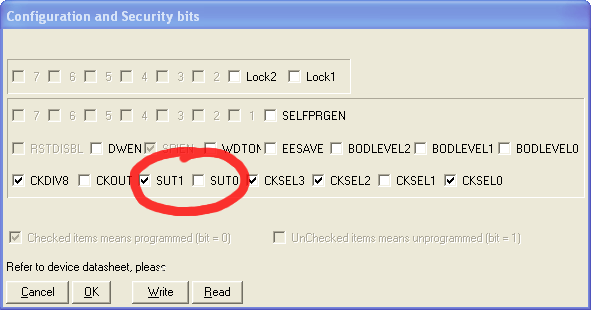
It is advisable to change the fused called SUT0 and SUT1 to 'fast rising power' to
avoid the current peak after power-on. This is recommended but not necessary for
correct operation of the HDR-Jack 2. The clock source is unchanged
(8 MHz internal oscillator).
Do not forget to program the EEPROM!
Download
hdr-jack2.hex - hex file (FLASH)
hdr-jack2.eep - eep file (EEPROM)
HDR-Jack_2_Bedienungsanleitung.pdf - manual in German
Can you build one for me?
Many people ask me to build the HDR-Jack 2 for them, because they don't have the programming tools or the necessary skills in electronics. So, from time to time I build a few them for others. You can contact me via e-mail (English or German) at

Supplement
For post-processing of the images I recommend to use enfuse with enfuseGUI. Both programms are free.
Your ideas are welcome. If you want to propose a new function, please use the
comment box below.
The author takes no responsibility for any injury or damage resulting from the
operation or construction of the device presented here.
Links
http://www.doc-diy.net/photo/hdr-jack
First battery-free version of the HDR-Jack
http://www.doc-diy.net/photo/eos_wired_remote
Remote trigger pinout of the Canon EOS 400D
http://www.atmel.com/dyn/resources/prod_documents/doc2586.pdf
ATtiny25 data sheet
http://wiki.panotools.org/Enfuse
enfuse is a free exposure blending tool for realistic looking results
http://software.bergmark.com/enfuseGUI
Windows GUI for enfuse
http://qtpfsgui.sourceforge.net
Qtpfsgui - free HDR software
http://research.edm.uhasselt.be/~tmertens/papers/exposure_fusion_reduced.pdf
An interesting paper about exposure fusion, a must for enfuse users
Temporary Email Temporary Email Throwaway Email


|
Last modified: Sun April 14th 2024 Copyright © 2024 www.doc-diy.net |
Ich würde gerne ein HDR-Jack bestellen (EOS 550d).
Bitte teilen Sie mir das nötige mit.
Vielen Dank
Werner
auch ich würde gerne einen HDR Jack 2 für meine Alpha 350 erwerben. Über eine positive Antwort mit einem Preis würde ich mich sehr freuen!
ist es noch möglich einen HDR-Jack 1 o. 2 zu erwerben. Falls ja würde ich mich über eine Antwort freuen.
(EOS 60D)
mfG
todden
Viele Grüße
Thomas
Luk
Würde gerne so ein Teil kaufen
Greate project.
Would you please publish a source code for the program. I like to port it to PIC microprocessor. I am familiar with it and have the programmer and a compiler.
Thank you in advance.
MfG Tom
ich bin wie viele Andere auch an dem HDR-Jack 2 interessiert. Teil mir doch bitte den Preis sowie die Zahlungsmodalitäten mit.
Viele Grüße
Hartmut
auch ich würde den HDR-Jack 2 sehr gerne für meine Canon 50D erwerben.
Über eine kurze Antwort würde ich mich sehr freuen.
Viele Grüße
Melo
ich wollt mich auch hier noch mal bedanken, das Luk meine HDR Jack 2 Bestellung so schnell und zuverlässig erfüllt hat :) Also ich kann ihn nur weiterempfehlen :)
die Sourcen des HDR-Jack 1 sind offen (siehe Nachbarartikel). Der Code des Jack 2 ist sehr ähnlich nur deutlich unübersichtlicher. Er ist nicht offen.
Luk
auch ich würde den fertigmontierten HDR-Jack 2 gerne für meine Canon 450D kaufen.
Für nähere Infos wäre ich sehr dankbar!
das ging ja flott, also wie gesagt bin sehr an diesem Stecker Interessiert.
Bitte schreib mir die Zahlungsmodalitäten auf.
Das Geld geht dann sofort raus.
Danke nochmals für die schnelle und Positive Antwort.
mfg Friedhelm Wien
ich möchte auch gerne einen HDR Jack 2 für meine Canon 5D bestellen.
Grüße und Danke
ich möchte gerne einen HDR Jack 2 für meine Canon 400D bestellen.
Gruss Heino
Was würde es den kosten wenn sie mir einen bauen würden .
Bitte informieren sie mich per Email.
Bin leider kein sehr begabter bastler.
auch ich würde den HDR-Jack 2 sehr gerne für meine Canon 50D käuflich erwerben.
Über eine kurze Antwort freue ich mich.
Viele Grüße
Michael
Hallo und gute Tag,
ich möchte mich auch in die Warteschleife der Besteller für den HDR-Jack II einreihen. Benötige der HDR-Jack II für meine Canon 50D.
Wär sehr schön, wenn das auch für mich Lieferbar wäre.
Viele Grüße
Peter
Die Aufnahmen sind ja absolute Spitzenklasse.
LG
Susanne Krofta
Außerdem kann ich damit auch mal endlich mit Zeitrafferaufnahmen etc. experimentieren.
many thanks for the feedback on the 20D. I investigated the battery grip bracketing idea recently. I think it should work fine. There is enough space to embed an AVR inside the grip and the power supply is no problem. Take a look on the article "EOS battery grip disassembled" on this site. You'll find there a close-up of the dial wheel and a description how it works.
Luk
Now I have have a HDR Jack2 and everything work fine to me!
I need to setup the HDR Jack2 as follows:
Mode 9 (exp gap 1,25 s)
Mode 13 (skip < 1/60)
Additional I set to Mode 15 (shutter only), but I'm not sure if this is necessary...
I think about installing the HDR Jack2 into my battery grip, but in the moment I just think about...
For me everything works PERFECT!!!
Thanks for HDR Jack2