

PhaseBrush - Simple visualisation of sound
Understanding acoustics is not trivial because we can't see the sound waves. A simple propagation of waves in one or two dimensions can be explained using a hanging rope or throwing a stone in water, but phenomena like standing waves in 3D or phase relations are harder to explain. A spectacular but rather DIY-unfriendly experiment is the Rubens tube, especially in the 2D version as show in the clip below.
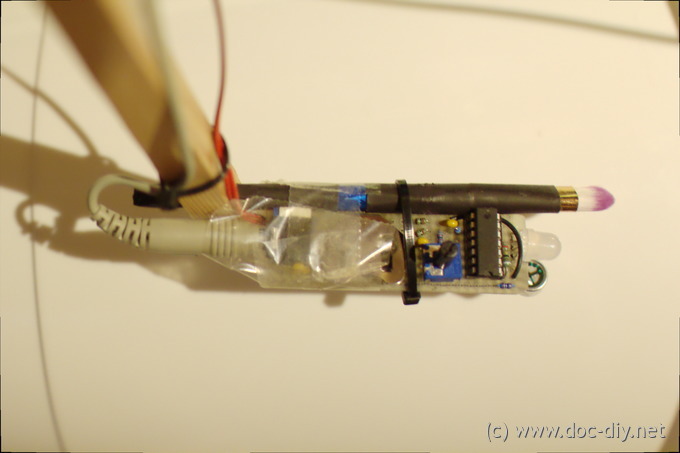
This article describes a little electronic gadget to visualize sound waves. It's called PhaseBrush because of its working principle. By moving (brushing) it around in the sound field, the LED colour will visualise the waves in real time. You can track the wave fronts or find the silent valleys. If you capture the brush motion with the changing colours in a long-time exposure you will obtain a 2D image of the acoustic as shown in the title image or the experiments presented below.
All this can be done with a microphone and post-processing too, but in an incomparably boring and tedious way.
To build the PhaseBrush you will need soldering skills and a programmer for AVR microcontrollers. Basic electronic skills are very recommended.
How does it work?
The visualisation is based on the sound pressure and the phase.
The sound pressure controls the brightness of the LED, independent of
the colour, that's all.
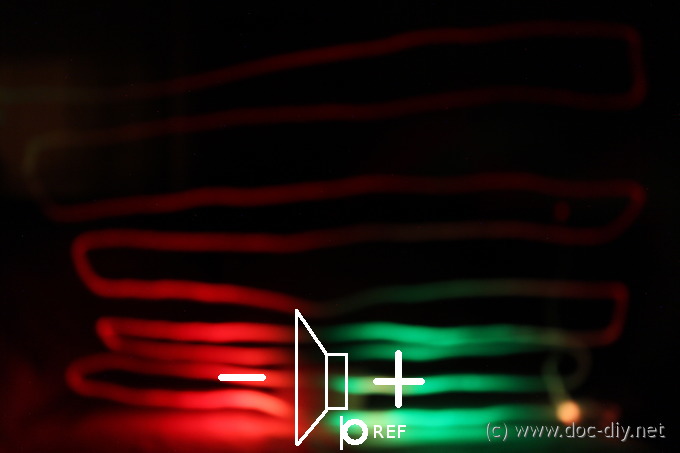
The phase decides if the LED shines green (in phase), red (out of phase)
or both (yellow, mixed phase). The
phase
of a signal is defined for pure tones and tells how the signals are
delayed with respect to each other. A sine and a cosine wave have
a phase relation of 90 deg. The signals sin(t) and -sin(t) have
a phase shift of 180 deg. It's also good to know that in a standing
wave the phases are just 0 or 180 deg with sharp jumps in between.
They are perfect for experiments with the PhaseBrush.
To get the phase reference signal a second microphone is used. It's usually
located directly at the sound source and is connected to the PhaseBrush
by a long cable.
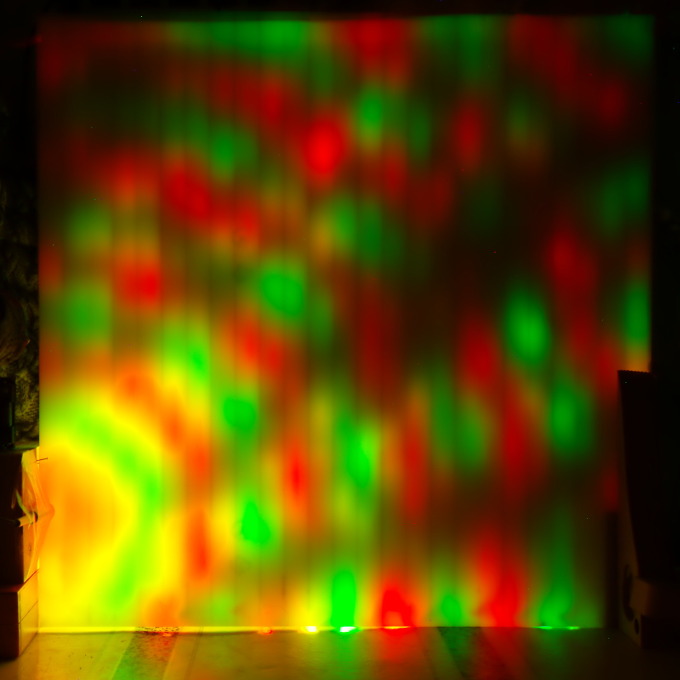
The picture below shows what happens when you move the PhaseBrush around
an open speaker (working as
dipole). The light
intensity drops with the distance as the sound decays. The green and
red colour indicate the positive and negative fields.
The Circuit - How to build the PhaseBrush?
Checking the phases and amplitudes of alternating signals is a very "analogue" task and asks for OP amps and comparators. A quick check how an analogue circuit could look like ended in something very unhandy (with more than 1 IC;) and the decision to squeeze everything into the AVR ATtiny24 microcontroller. It has an AC, an ADC and PWMs for the LED control. All the rest is done in software. The prototype showed: timing and precision are OK. The details are below.

In the PhaseBrush the phase is compared between the reference microphone and the probe microphone at the tip of the brush and close to the LED. The reference mic is connected to the internal analogue comparator (AC) in the AVR. The uC observes if the reference signal is positive or negative (timed by ADC complete interrupt). Parallel to that, the probe mic is evaluated continuously using the integrated analogue-to-digital converter (ADC). The sampling rate is enough to monitor signals up a few kilohertz. The ADC works in free running mode and triggers an interrupt after each conversion. The interrupt service routine checks the sign of the reference mic and the value of the probe mic. For equal signs the green LED is fired, for opposite signs the red LED is fired. Both the red and the green LED is PWM controlled from Timer 0 (8 bit). To convert the sound pressure to a reasonable brightness a logarithmic look-up table (LUT) is used.
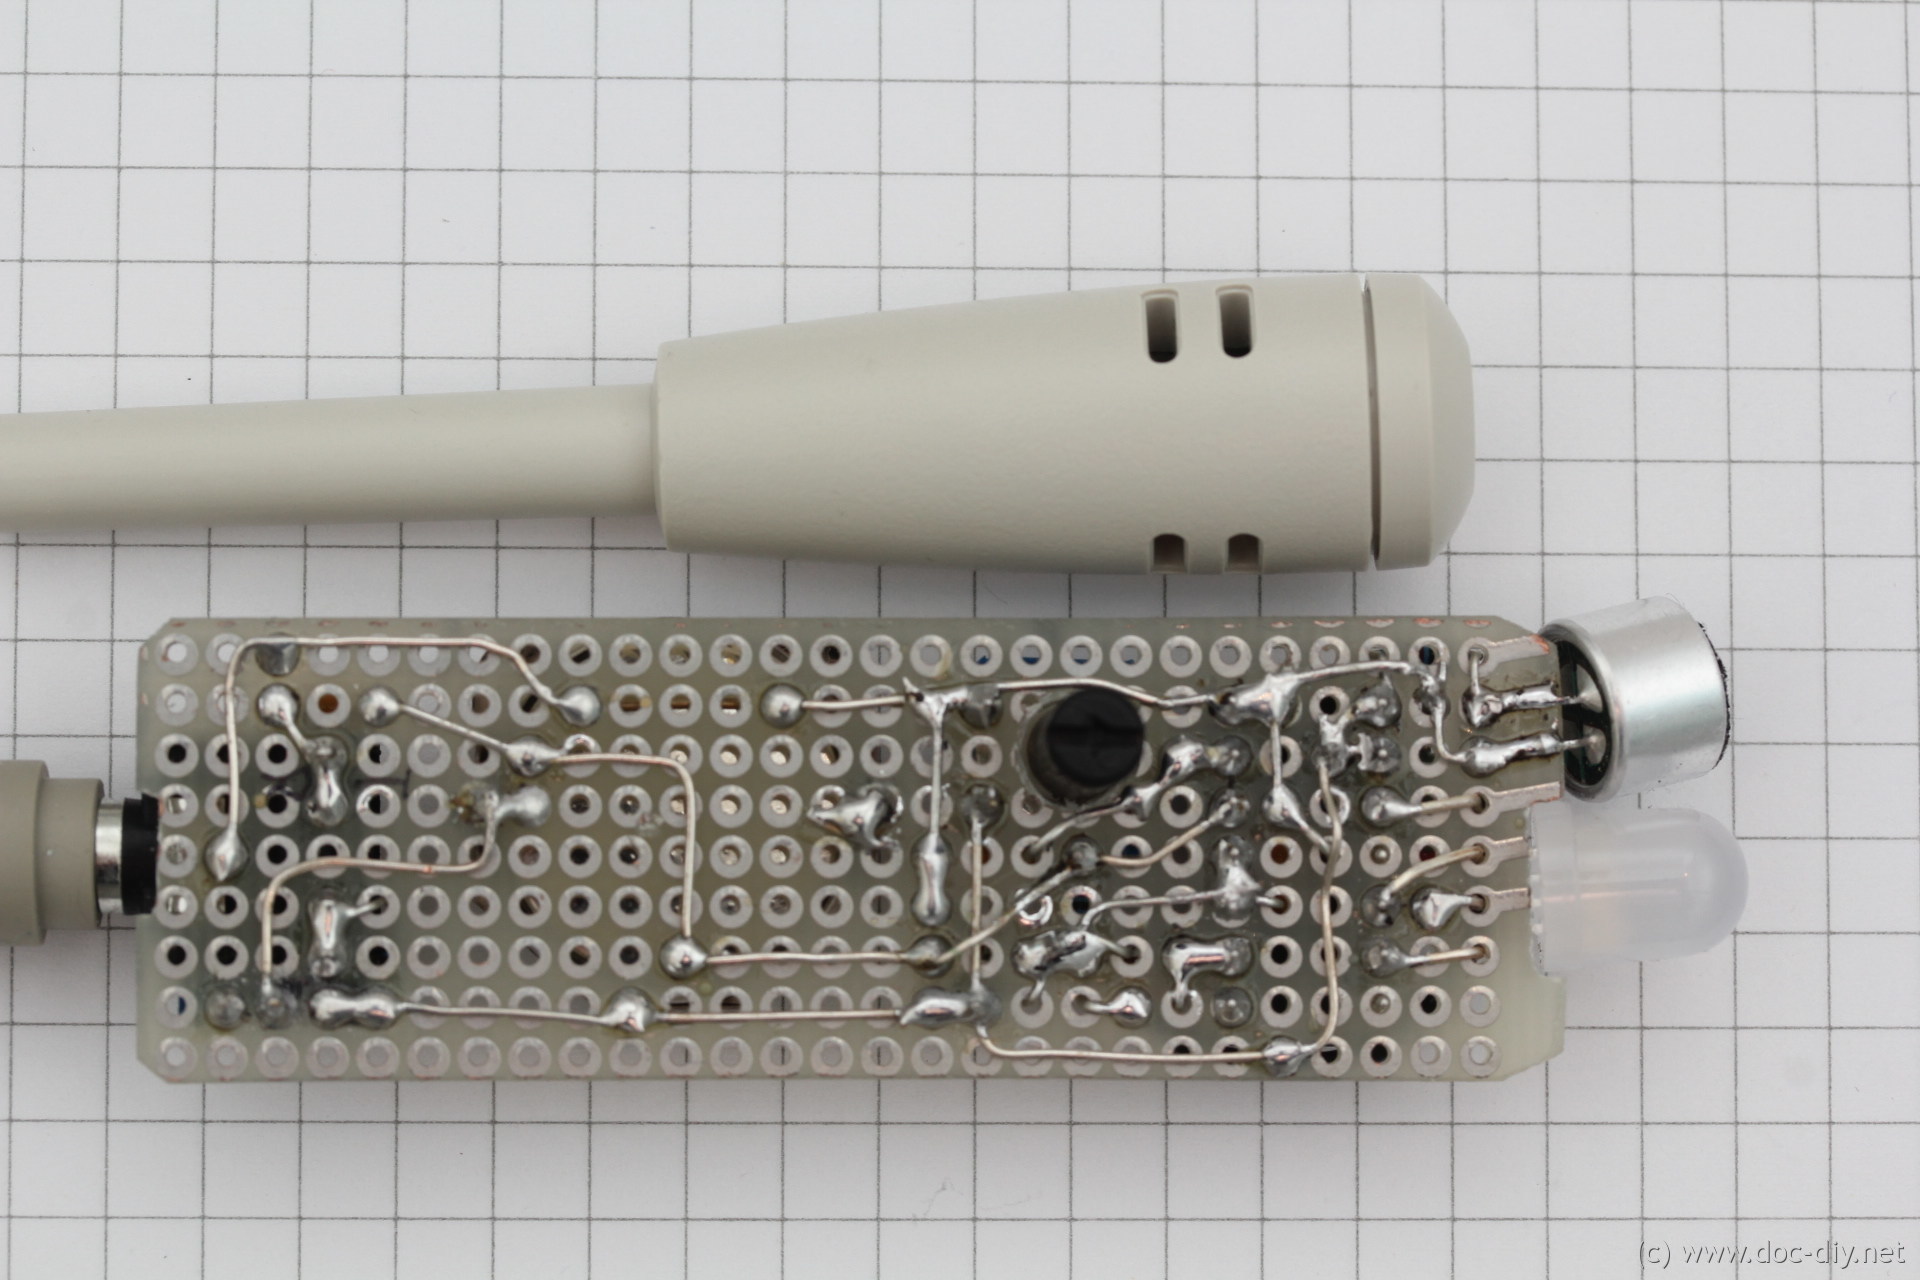
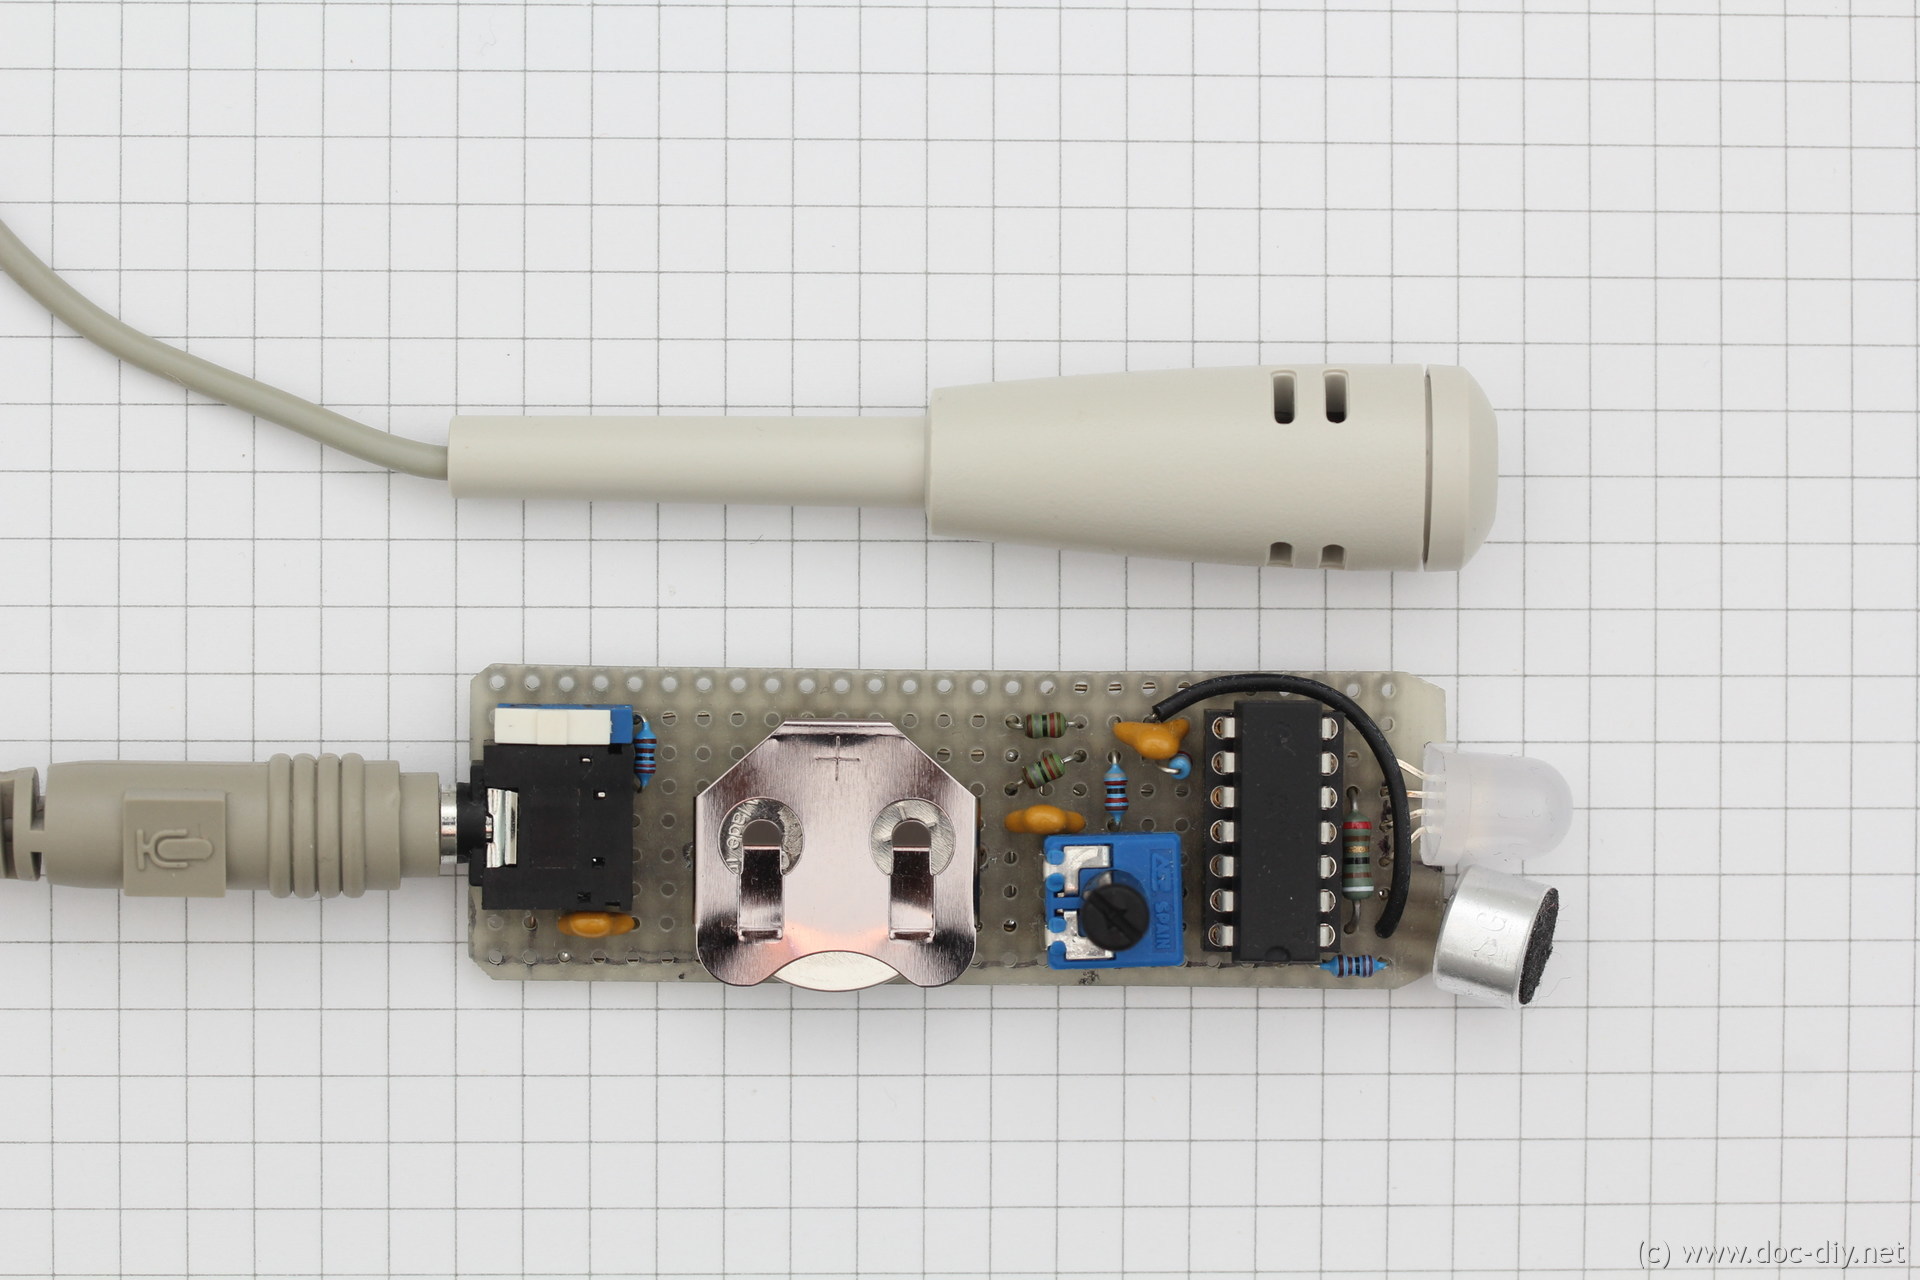

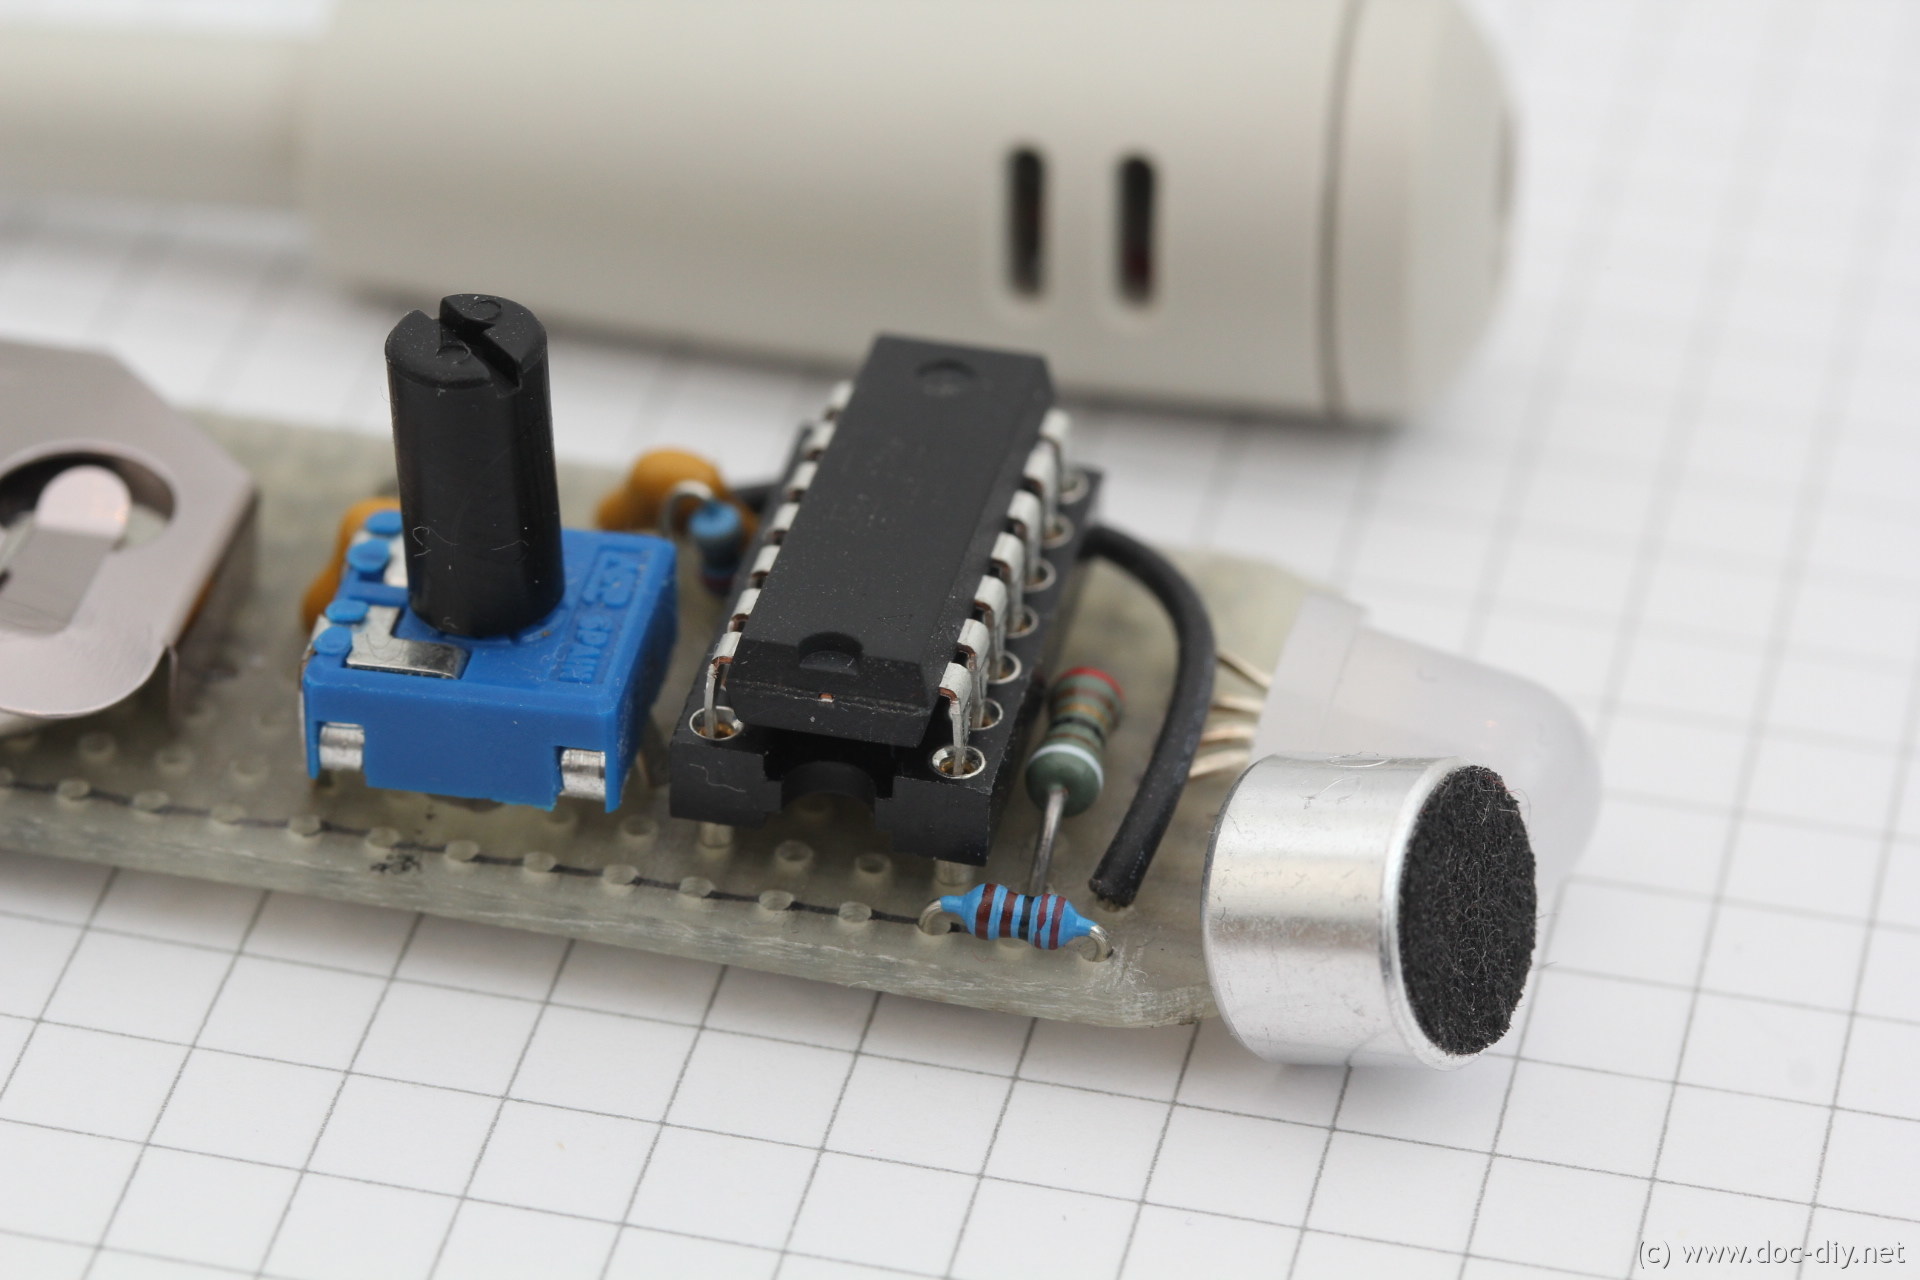
Dealing with AC signals from the mics requires a "central" virtual ground at roughly VSS/2 made by the voltage divider (R4, R5). The virtual ground serves as the negative input for both the AC and the ADC. The ADC works in differential mode and delivers a signed 8 bit result. The ADC reference voltage can be adjusted with a trimmer to set the sensitivity of the detection.
Important note: The 2032 battery drains quite quickly resulting in a weak green colour response. I recommend two AA batteries as power supply if the PhaseBrush is used for longer time.
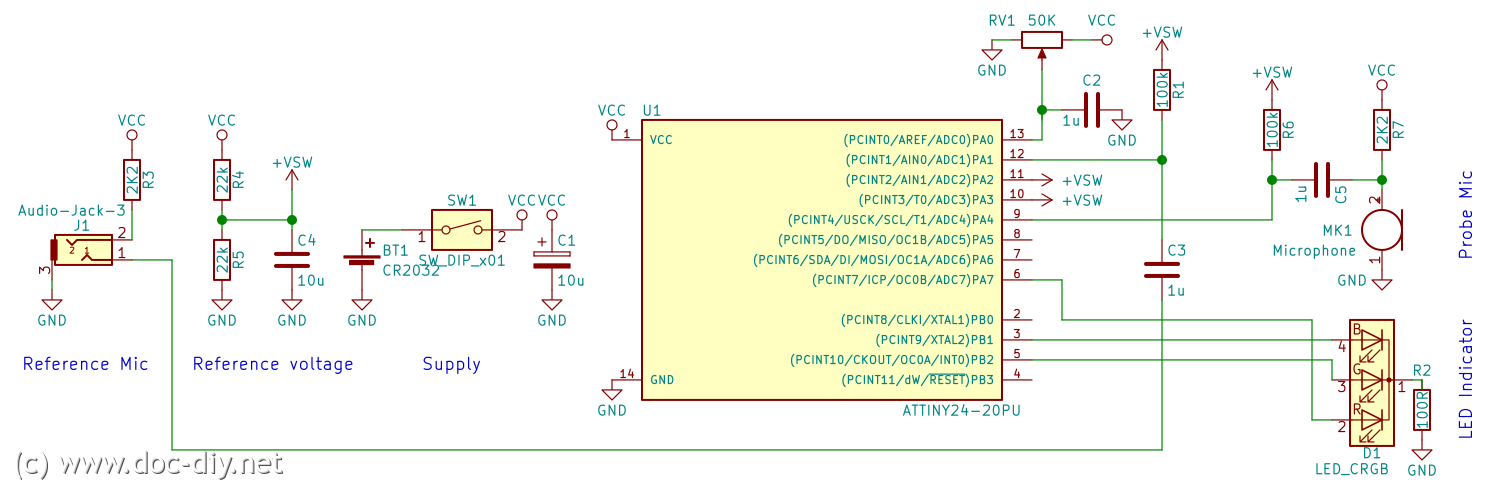
The source code in C and the compiled hex file are available below. There is no need to change the fuses in the ATtiny24. A PCB design doesn't exist in the moment.
phaseBrush.cphaseBrush.hex
Capturing sound images
For capturing sound images in open space 1-2 Watt power will be
needed for >1000 Hz. Lower frequencies require more power. In case
of standing waves (resonances) the sound energy accumulates so less
power is needed. A 32 Ohm speaker connected to a phone might be enough.
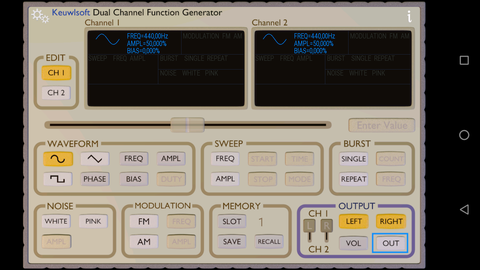
If you don't have a hardware function generator at hand the function
generator app by
Keuwlsoft
will solve the problem. It works surprisingly well.
Last but not least: Protect your ears! Even at low amplitudes the tones go straight into your Cortex and are very annoying.
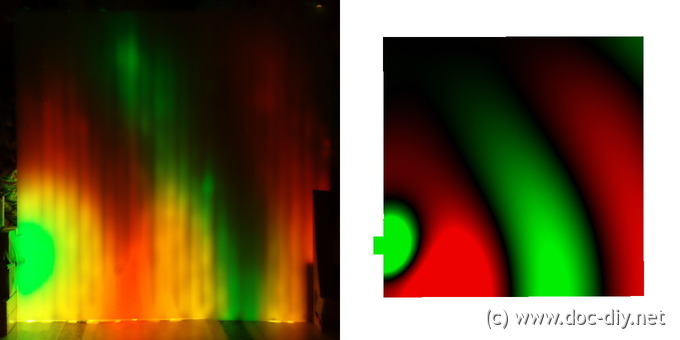
Travelling waves from a speaker
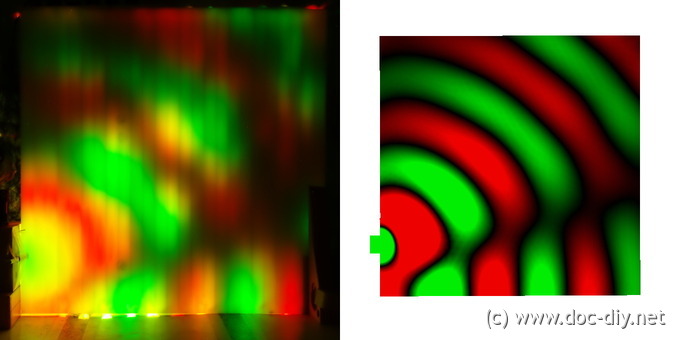
In this test the sound field generated by a speaker is captured.
The speaker is mounted 10 cm (4 inch) above the floor. A matt screen (50x50 cm, 20x20 inch)
is mounted parallel to the speaker axis. By sliding the PhaseBrush
over the screen line by line the amplitude and phase of the
sound field can be caputred.
The phase reference mic is taped directly to the speaker.
A long time exposure photo records the
movement of the PhaseBrush. The results are shown below along with
the corresponding simulated sound field. It should be noted that
the unechoic conditions in the simulation are not given in the
experiment causing some deviations. All in all, the fields show a
surprisingly good agreement for the relatively simple setup.
Each scan takes about 2 minutes depending how precise you are.
I used a (real) brush to slide silently over the screen and define
the distance to the screen. This also adds a smoothing effect.
 1000 Hz
 2000 Hz
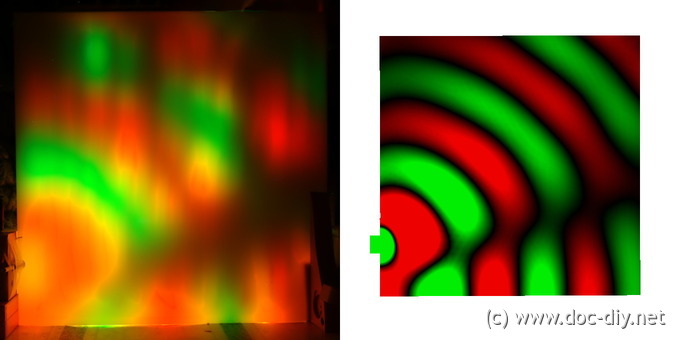 2000 Hz
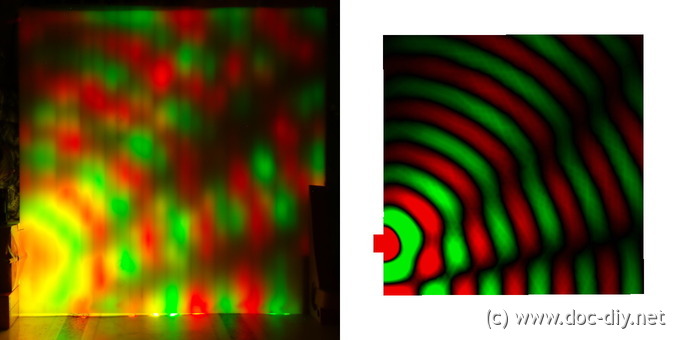 4000 Hz
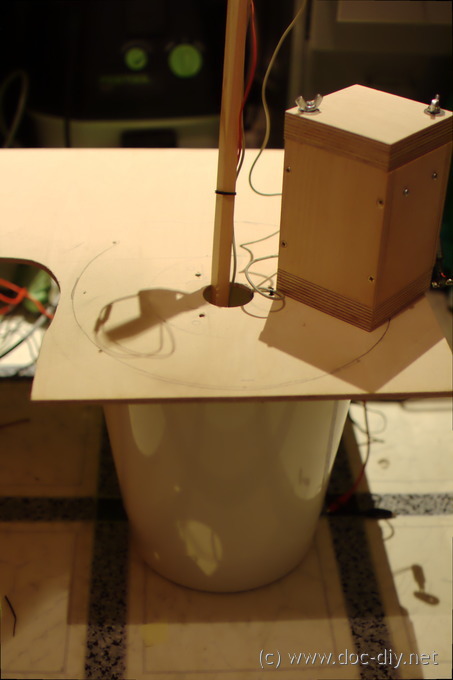
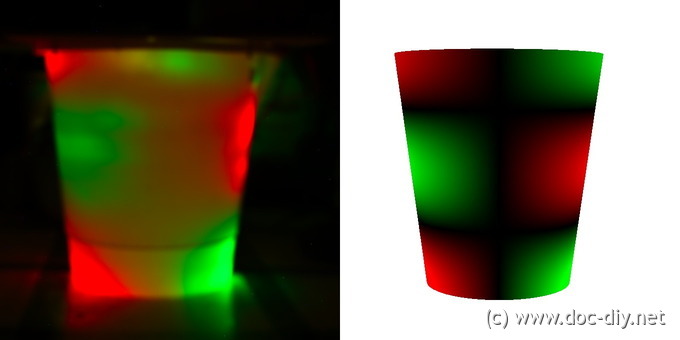
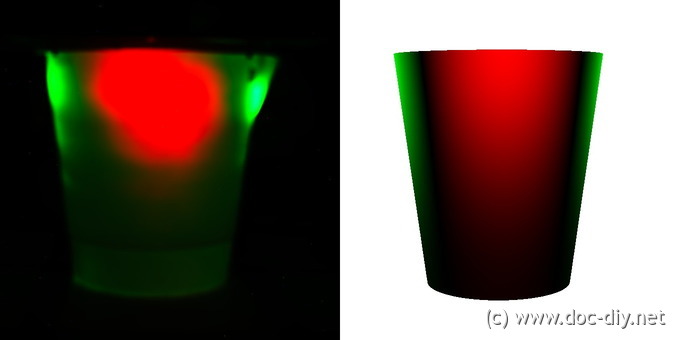
Cylinder eigen-modes
This experiment visulalises the resonances (eigen-modes) in a cylindrical (or rather conical)
bucket. In contrast to the travelling wave case above, where the phase grew
linearly with the distance we just have phase 0 and 180 deg. This is due to
the nature of standing waves. Effectively we don't expect yellow areas in
the images.
The test setup is shown below. The PhaseBrush is now mounted on a stick to slide
it along the inner bucket wall. The speaker with the reference mic attached
are mounted to the cover plate.
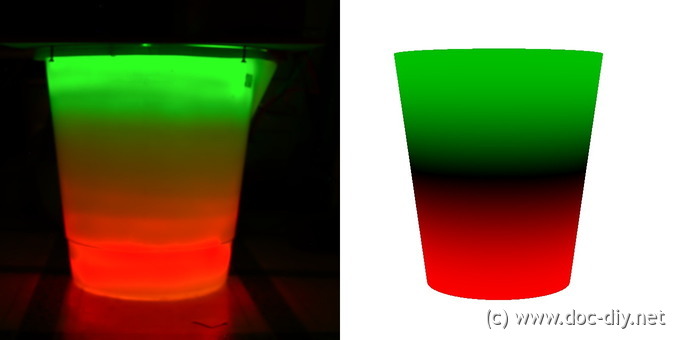 1L - first longitudinal mode
 2L - second longitudinal mode
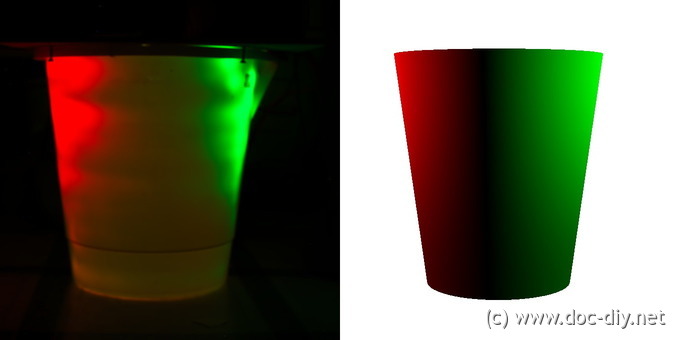 1T - first tangential mode
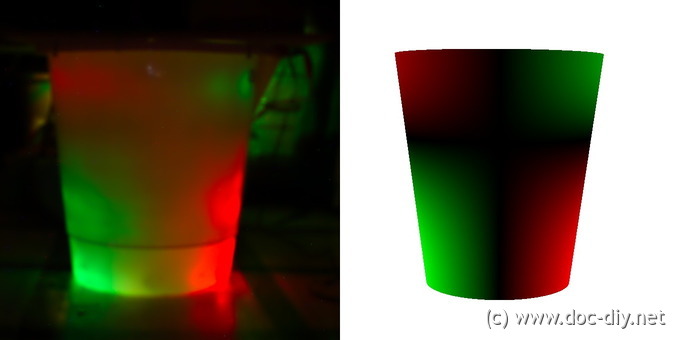 1T1L - first tangential and longitudinal mode
 1T1L - first tangential and second longitudinal mode
 2T - second tangential mode
Feedback is welcome! Let me know if you have tried out something similar or need help with the electronics.
Throwaway Email Disposable Email Throwaway Email


|
Last modified: Sun April 14th 2024 Copyright © 2024 www.doc-diy.net |