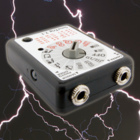


HDR-Jack - The ultra-compact interval and HDR trigger
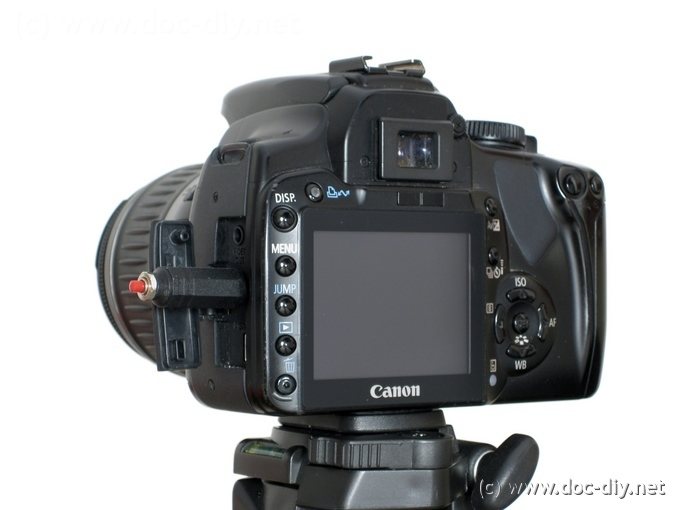
This article explains how to build an ultra-compact, AVR controlled multipurpose trigger for Canon EOS cameras (e.g. EOS 350D, EOS 400D, EOS 450D, EOS 1000D). The trigger features an interval function (intervalometer) for time lapse photography and a HDR trigger mode for shooting long bracketed image series. There is also a bulb mode for astronomy or high-speed photography and a delayed trigger option for long exposure photography. The complete circuit is accommodated in the 2.5 mm jack plug needed to access the remote trigger connector. It's so small you can keep it with the camera or use it as a key fob.

Interval trigger
The interval trigger function can be used for scenarios like growing flowers, moving clouds, traffic, construction and demolition of buildings, melting ice, parties, rotting food, capturing lightnings, surveillance, crowds of people, sunrises, sunsets, astronomy, time stamping... All this in Full HD or better! It's also usable for averaging (noise reduction) or tourist removing.
HDR trigger with bulb mode bracketing
The abbreviation HDRI or just HDR stands for High Dynamic Range Image. This is a technique to create a high dynamic range image from a set of photographs covering different exposure ranges. The set of photographs should have exactly the same image content, this means the image sequence is ideally shot from a tripod one after another without touching the camera. This can be easily accomplished by using the bracketing mode implemented in most DSLRs. The problem is that most cameras just allow three images with max. +-2 EV — this is not enough for very dynamic scenes like night shots. This is where the HDR-Jack comes into play. The whole series is shot at the push of a button. The trigger uses a technique called bulb mode bracketing to generate the image sequence.
BULB trigger
The classic application of the bulb mode is astrophotography. It's also useful for controlling the camera when working with a flash in a darkroom like in high-speed photography. The bulb mode can also be used to capture lightnings by triggering the camera continuously in serial shooting mode. Another application is shooting the in-camera bracketing series at once. In some cameras like the EOS 400D, you have to push the shutter button 3 times. This can be avoided using the HDR-Jack.
Modes of operation
The integration of the trigger circuit into a jack plug housing doesn't allow to use a switch for the direct selection of the operation mode. Instead, all functions are selected by pushing the button located at the end of the plug. This method has the advantage, that the possible number of functions is only limited by usability or in other words the user's memory for the function codes. All modes are listed in the table below with the corresponding activation sequence. The "O" in the columns "Activation" and "Interruption" stands for pushing the button one time.
| # | Function | Activation | Interruption |
|---|---|---|---|
| 1 | Single shot, 2 s delay | O | none |
| 2 | HDR exposure | OO | O |
| 3 | HDR exposure w/ mirror lock-up | OOO | O |
| 4 | BULB mode | OOOO | O |
| 5 | Discrete interval trigger tinterval = number of pushes - 4 | OOOOO+ | O |
| 6 | Variable interval trigger tinterval = time button pressed | O > 0.5s | O |
1. Single shot, 2 s delay
This function is equivalent to the 2 s self-trigger in the camera. It is meant
for long time exposure where camera shake caused by pressing the shutter-button
must be avoided. This mode occupies the "pole position" because it turned out
to be used frequently in practice. In the EOS 400D the 2 s self-trigger is only
available in mirror lock-up mode. Canon why?
Because of the trigger pulse duration this mode can trigger auto-bracketed shots if
the camera is set to continuous shooting.
2. HDR exposure
The camera must be in BULB and MF mode in order to use this function.
In this mode the trigger generates a sequence of pulses with increasing
duration. The result is a series of images with an exposure step of about 2 EV.
The exposure times are approximately 1/250 s, 1/60 s, 1/15 s,
1/4 s, 1 s, 4 s, 16 s.
The shortest pulse is not very reliable in terms of the effective exposure time,
so the 2 EV step is not guaranteed here (tested with Canon EOS 400D).
3. HDR exposure w/ mirror lock-up
This mode is very similar to the previous one.
In this mode an additional pulse is generated before each exposure sequence to lift the
camera mirror. The exposure times are shifted up one EV compared to mode 2. They
are 1/32 s, 1/8 s, 1/2 s, 2 s, 8 s and 32 s.
4. BULB mode
Pushing the button four times starts a long time exposure of infinite duration.
Pushing it again terminates the exposure. You don't have to hold down the shutter
button anymore. This mode is used usually for astro photography. It is also very
useful when taking bracketed shots. If the camera is set to auto-bracketing mode combined with
continuous shooting all three pictures will be taken by activating the BULB mode.
5. Discrete intervalometer
This mode allows interval shooting with an interval of N seconds, where N is the
number of times the button has been pushed minus 4. Pushing five times results
in an interval of 1 s, 20 pushes in 16 s and so on. The timer has been adjusted
to have an error of less than 1% with canon cameras (3.3 V at remote control
connector).
6. Variable intervalometer
This mode is very easy to use. If the button is held down for more than 0.5 s,
the holding time becomes the interval of the timer. If you hold the button
down for 22.5 seconds the interval will be 22.5 seconds. The maximum interval is more
than two hours. This mode can also be used to trigger auto-bracketed shots.
All modes except the single shot mode can be interrupted by pressing the push-button
once.
Usage of HDR modes
- Plug in trigger
- Set the camera to the manual mode M
- Set shutter speed to BULB
- Set aperture
- Focus on scenery
- Set camera to manual focus
- (Enable mirror lock-up if desired)
- Trigger by pushing the button in HDR-Jack
The interval modes require no special settings of the camera. It is recommended to use manual focusing especially for dark scenes to avoid missed triggers caused by focus hunting.
Compatibility
The HDR-Jack is theoretically compatible to all cameras with a 2.5 mm jack remote
connector which can be triggered by pulling down the shutter wire only.
The HDR-Jack was tested successfully with the Canon EOS 350D, 400D, 450D and
1000D until now.
Frédéric from the autopano forum reported that at the EOS 20D only the shutter
wire has to be pulled down, so the trigger will probably work with the 20D too.
An N3-to-jack adapter will be necessary.
The trigger doesn't work with Canon EOS 40D, Nikon D80, Sony Alpha 300,
because in these cameras both the focus and shutter wire must be pulled
down to ground.
A reader reported that the HDR-Jack worked correctly with his Pentax K20D. I didn't test
with Pentax myself. Pentax uses also the small 2.5 mm jack connector for remote triggering.
The K200D has the problem, that the remote connector is placed so close to
an adjacent wall, that you can't plug in a jack connector of normal size (clearly a design fault).
Sand paper will be necessary here...
How to test a camera for HDR-Jack compatibility?
Modern DSLRs have usually two remote control wires. One controls the shutter,
the other is responsible for the focus. To keep the shutter open in bulb mode, in some cameras
only the shutter wire must be connected to ground. These are the good ones, which are
compatible with the HDR-Jack. The others, the bad ones, require both wires to be
connected to ground. As the HDR-Jack is supplied from the focus wire, pulling it
down would result in a breakdown of the supply voltage and a reset of the uC.
To test your camera, switch to bulb mode and use tweezers or a piece of wire to short circuit
the contacts (at your OWN RISK!).
Fist connect the shutter wire to ground for a second or so and check whether the
shutter stays up (and doesn't fall back spontaneously).
If that works, your camera is compatible. If not, connect the focus to ground permanently and
connect the shutter to ground for one second. If this method fails to keep the shutter up, you're
doing something wrong or you have a very strange camera. In case it works, you are doing
everything right but your cam isn't compatible.
Don't forget to switch to manual focusing for immediate exposure for the test.
Don't forget to feedback your results to www.doc-diy.net and share it with other DIYers!
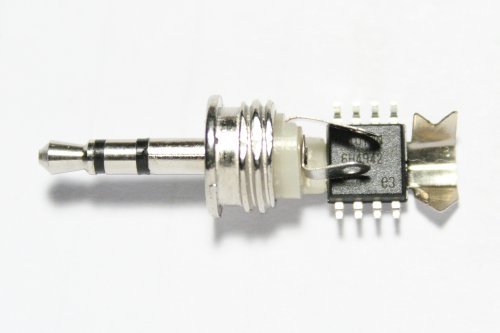
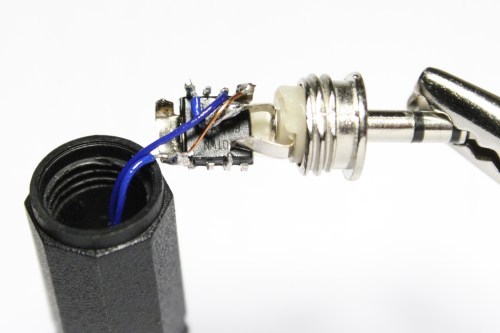
The Circuit - simple yet effective
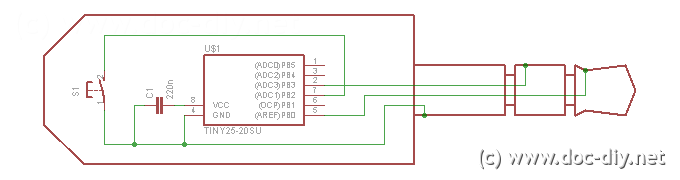
The circuit is trivial, it consists of just three parts. The ATtiny25 AVR
microcontroller, a push-button and a small cap.
There is no battery, the circuit is powered by the photographer's creative
energy... no it draws current from the focus-wire of the remote control connector.
The whole circuit has a current consumption of just 7 uA.
Why it's possible to supply a circuit from the remote control connector is
explained here.
At this point I would like to acknowledge Stefan aka stefx from
www.dslr-forum.de, who inspired me to
start this project by posting a battery-free remote control circuit.
The last thing to mention is the strange way the AVR is connected to the
supply voltage. To reduce the current consumption it's supplied via an
input pin instead of the VCC pin. The trick was also used for the
SmaTrig project and is described in detail
here.
Parts and Assembly
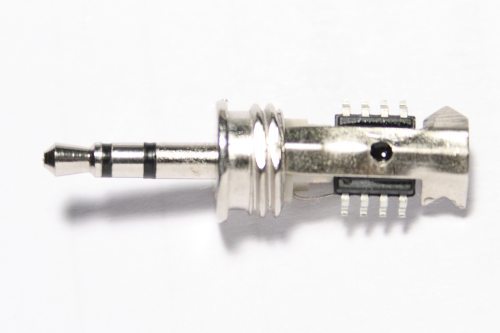
The only difficulty to overcome when building the HDR-Jack is to find a push-button which is small enough to fit into a jack plug (2.5 mm) or vice versa, a housing big enough to accommodate a push-button. I found out that most housings of 2.5 mm and 3.5 mm jack plugs can be swapped. Below is a comparison of different plugs that have collected over the years in my junk box.

The ATtiny25 can be replaced by an ATtiny45 or ATtiny85. The only difference
is the flash memory size (and the price). There is also a low voltage version
of the controller with a V appended to the name (ATtiny--V). It is also a
very good (or even preferred) choice.
The cap can be replaced by a bigger value.
It's value doesn't depend on the chip version or package.
The components are soldered directly to the plug connectors as shown in the images below. I glued the AVR directly to the ground lug to facilitate soldering. The push-button cables should be thin and flexible. There are many ways to build the circuit, an example is shown below
Software
The code is written in C. The crucial point in the code is to keep the
controller in low power modes most of the time to reduce the average current
consumption below 30 uA (threshold for shutter release at remote
contact for EOS 400D). To achieve this, the controller is put in power-down
mode and the watchdog timer is used to wake up the uC repeatedly for a few
cycles via interrupt. The push-button is scanned during these short active
phases and the output is changed if necessary.
The code consists of a main loop which monitors the button activity. If a
function code has been detected, the uC jumps into the desired function.
Most functions can be interrupted by the user by pressing the pushbutton.
In this case a software reset is executed and the program restarts.
Refer to the comments in the source code for further details. The necessary
files can be downloaded in the download section below.
If you want to change the timing of the HDR series to longer exposure times
for example, you just have to modify the code sections corresponding to the
button functions. For function 2 it's
...
if (push==2)
{
    ...
    DDRB |= (1<<SHUTTER);
    wait_inter_125ms(8);   // 8*125ms = 1s
    DDRB &= ~(1<<SHUTTER);
    ...
}
Note that the argument of the function wait_inter_125ms() is an unsigned 8 bit integer (0-255) resulting i a maximum time of approx. 32 s. For longer times call the function multiple times.
Programming
You will need a programmer to transfer the hex file to the microcontroller.
There is a big variety of programmers on market and on DIY web sites.
Depending on the features (USB, parallel port, JTAG, debugging functions)
the costs range between 1 and 100 Euros. I use a home-brew
STK200 clone
for the parallel port. I you want to buy a programmer, go for a simple and popular
(forum support) USB version. The good thing about programmers is that any programmer
will program any AVR microcontroller.
If you are not familiar with microcontrollers I strongly recommend to go through
one of the beginner tutorials at avrfreaks.
German readers should also have a look at www.mikrocontroller.net
If you have your programmer working, the programming is rather straightforward.
Note that if the AVR clock
has been changed to the internal 128 kHz oscillator, tools
like PonyProg won't work anymore, because the ISP communication is too fast then.
I recommend to program the flash first and change the fuse bits afterwards.
The fuse settings for the HDR-Jack are shown in the screenshot below.

Download
hdr-jack.c - C source code
hdr-jack.hex - hex file
HDR-Jack_Bedienungsanleitung.pdf - manual in German
Can you build one for me?
Many people ask me to build the HDR-Jack for them, because they don't have the programming tools or the necessary skills in electronics. Unfortunatelly I can't build it, because I can't find the right jack plugs (long housing) anymore. Take a look at the HDR-Jack 2 or the Smatrig.
Supplement
Your ideas are welcome. If you want to propose a new function, please use the comment box below.

Last but not least:
The author takes no responsibility for any injury or damage resulting from the
operation or construction of the circuit presented here. While the risk of an
electrical damage of the camera is small, one reader reported a mechanical demage
of his camera by a disintegrated plug blocking the connenctor.
Links
http://www.doc-diy.net/photo/hdr-jack2
HDR-Jack 2 - Improved battery version of the HDR-Jack
http://www.doc-diy.net/photo/eos_wired_remote
Remote trigger pinout of the Canon EOS 400D
http://www.atmel.com/dyn/resources/prod_documents/doc2586.pdf
ATtiny25 data sheet
http://qtpfsgui.sourceforge.net
Qtpfsgui - free HDR software
Throwaway Email Throwaway Email Disposable Email


|
Last modified: Sun April 14th 2024 Copyright © 2024 www.doc-diy.net |
Luk
Just didnt really think it would work without the other instructions in your command line instruction.
Neat little project!!
I am a fan of your work. You have done excellent projects for photographers. Your website is one stop solutiosn for finding photography related projects :)
Sir, I am in a process of building a panoramic robot. we have made base, mechanical with steppers and gears. Now With help of local hobyist club we have made its basic board. We are using PIC because AVR controllers are hard to find specially ATINITY.
Now at this stage base is rotating frame, stopping but we are capturing images manually. This is where we need your help. I have basic knowledge that we make a circuit to short focus+ground or shutter + ground cables to focus or take images. we need to add a multiprupose trigger like that into panoramic robot. So that it can take HDR/bracketed images, timelapse images etc.
We have Canon 20d. Can you please! Guide us how can we make such a trigger attached with microcontroller. Any help with PIC will be highly appreciated. But I hope AVR code can be used in PIC. I am not an expert into all these electronics things :)) But my hobbyist club member can understand that.
Looking forward for your help and being an expert we will be very thankful if your share any valuable idea from your side regarding our project.
Regards,
Emaad
Ich würde gern bei Ihnen jeweils einen
ATtiny25 programmiert für HDR-Jack und HDR-Jack 2
bestellen.
Vielen Dank schon im Voraus
Günter Schmidt
thanks for the hint. I already developed a similar version of the code for battery operation using INT0 as wake-up source without WDT. In case of the HDR-Jack the supply current (7 uA with WDT) has no meaning so I didn't upgrade the code.
I used the ATtiny25 because it's a popular chip and I had a bunch of them in my junk box. I also like the option to upgrade to 4k or 8k. The tiny13 is the cheapest "hardware" for the HDR-Jack, but it's becoming obsolete now.
Luk
Luk
Luk
I'm willing to pay someone to build a couple of these for me as I've no electronics knowledge whatsoever.
Conatct me via darren@thomascgi.com
Thanks
The integration of the chip into the wired remote control enclosure is no problem. You just connect the cable and the switch (full press contact) to the chip. You can even use a DIP package instead of SMD for the microcontroller. There is enough space in the remote. You can also integrate an extra button in the side wall if you want to preserve the full functionality of the remote. The only problem is that I didn't test the HDR-Jack with the 5D(mk2).
About programming: I added some info about programming to the web site above. I recommend you a simple USB programmer. I use a parallel port programmer, but I know it's not a solution for the future.
luk
this is a good idea. I thought of it too after pushing the button so many times. I'll implement this 2^N series in the new version of the trigger, I'm currently building. I will set the longest interval to 8h or three images per day. This would allow for a daily time lapse movie.
Luk
Very nice project!!!
I suggest modifying your 5th mode according to this:
Instead of taking:
interval_time = number of pushes - 4
try to implement:
interval_time = 60^((number of pushes - 4)/6)
This divides every "60" into 6 steps (according to the Theory of the E-Reihe):
1 push(+4) = 2 (rounded to full seconds)
2 4
3 8
4 15
5 30
6 60
7 2 minutes(rounded to full minutes)
and so on
If this is repeated 3 times, you will be able to set long interval times (push 18 times for 60h interval).
you could also take the 24h interval instead of the 30 h interval for the 17pushbuttontimes.
Cheers, Nils
well done, thx for posting.
The main feature of the HDR-Jack is that no external power supply is needed. The supply current is drawn from the camera's remote connector (read the section "The Circuit — simple yet effective"). You can use the Trigger with Canon EOS 350D, 400D, 450D, 1000D. Pentax was not tested until now. Other manufacturers have different plugs.
Cheers, luk